Using AWS WAF to protect your WordPress site hosted on AWS
First blog post of the new year. It’s been a while. Throughout my cloud journey and continuous learning of the AWS platform and its services, I often notice that security is often overlooked when deploying WordPress sites, most tutorials will guide you through the steps for deploying a highly available WordPress site and neglect to show ways in which you can protect your WordPress site once deployed.
Disclaimer - The use of an AWS Web Application Firewall (WAF) and managed rules highlighted in this blog post is by no means exhaustive but can help improve your security posture and better protect your WordPress site, in this blog post we’ll take a look at using specific AWS Managed Rules for WAF.
Please take note that an AWS WAF can only be attached to the below resource types:
Amazon CloudFront distributions
Application Load Balancer
Amazon API Gateway
Amazon AppSync
An AWS WAF can be thought of as product that inspects traffic between your web application and the internet, it makes use of rules that allow you to block or allow web requests based on conditions that you define.
We’ll be making use of a Web ACL and a few AWS Managed Rules to protect our WordPress site.
Managed Rules contain pre-defined rules that are designed and managed by AWS and AWS Marketplace sellers to protect your web application.
The AWS Managed Rule Groups that will be used are listed below:
WordPress application managed rule group
The WordPress application rule group contains rules that block request patterns associated with the exploitation of vulnerabilities specific to WordPress sites.
SQL database
The SQL database rule group contains rules to block request patterns associated with exploitation of SQL databases, like SQL injection attacks. This can help prevent remote injection of unauthorized queries.
PHP Application
The PHP application rule group contains rules that block request patterns associated with the exploitation of vulnerabilities specific to the use of the PHP programming language, including injection of unsafe PHP functions. This can help prevent exploitation of vulnerabilities that permit an attacker to remotely run code or commands for which they are not authorized.
Admin protection
The Admin protection rule group contains rules that allow you to block external access to exposed administrative pages.
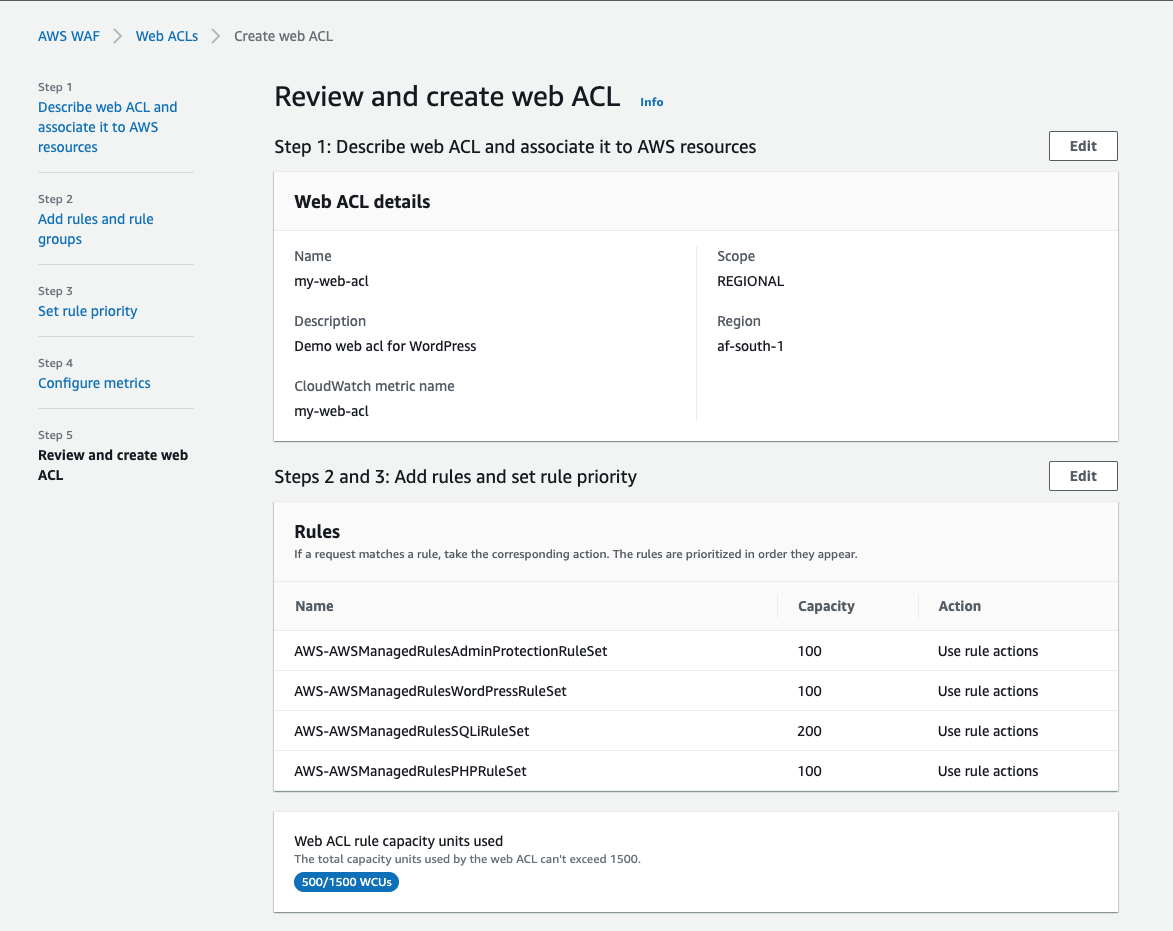
An important concept to understand is Web ACL rule capacity units (WCU), for each rule group you enable, capacity units are accumulated and should not exceed 1500 WCU’s, this is a calculation done by AWS to control the operating resources required to run your rules, rule groups and Web ACLs.
The estimated cost for creating 1 Web ACL is $ 5.00 per month (prorated hourly). Since we will be only using free rule groups, you will be charged for duration you have a WAF created and a Web ACL in use.
Let’s get started with creating our first AWS WAF with managed rules and attach it to an application load balancer, later on we’ll even restrict access to the WordPress admin area to be only accessible to an IP address that we specify.
Setting up an AWS WAF, Creating a Web ACL & Adding AWS Managed Rule groups
Sign in to the AWS Management Console and navigate towards to the AWS WAF console.
Select Create web ACL.
For the Name field, enter a name for the Web ACL and select the resource type you wish to associate this Web ACL with.
Select Add AWS resources, select an existing resource type (CloudFront / Application Load Balancer etc.) and select Next.
On the Add rules and rule groups page, select the Add rules drop-down from the Rules section.
Select Add managed rule groups, on the Add managed rule groups page, expand AWS managed rule groups.
Under the Free rule groups section, switch the toggle to on for the below rule groups:
Admin protection
PHP Application
SQL database
WordPress application
Select Add rules. On the Add rules and rule groups page, select Next.
On the Set rule priority page, you can move the rules up and down to change the evaluation order.
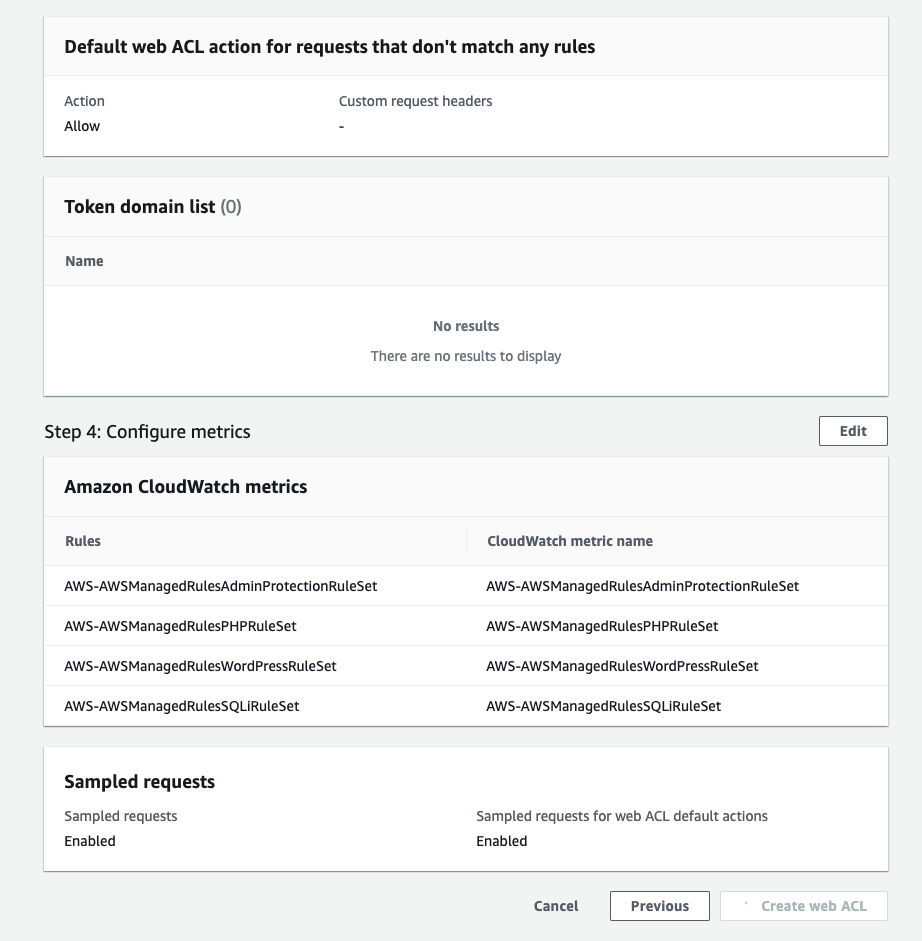
On the Configure metrics page, ensure that the rules are checked and the Enable sampled requests option is selected.
On the Review and create web ACL page, review the settings you have chosen and then select Create web ACL.
Creating an IP Set
In order to restrict access to the WordPress admin area to be only accessible to an IP address of your choice, you”ll need to first create an IP Set.
- Navigate towards IP Sets and select Create IP Set.
- Provide a name, choose the AWS region where your other AWS resources have been deployed and provide an IP address.

Restricting access to WordPress Admin area
- Navigate towards Web ACLs and select the Web ACL created earlier.
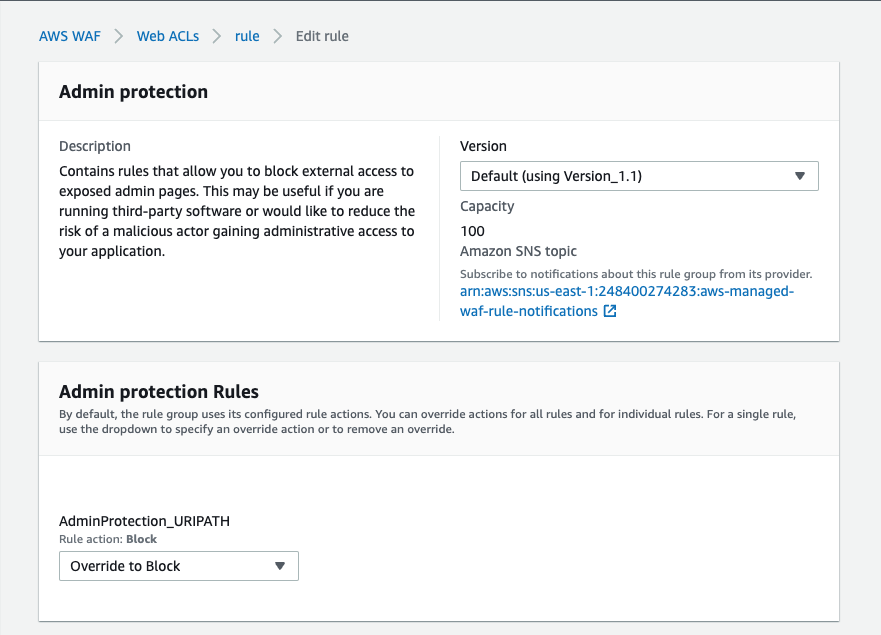
- Select the Rules tab, select the AWS-AWSManagedRulesAdminProtectionRuleSet rule and select Edit.
- Select the Override to Block option from the drop-down in the Admin protection Rules section.
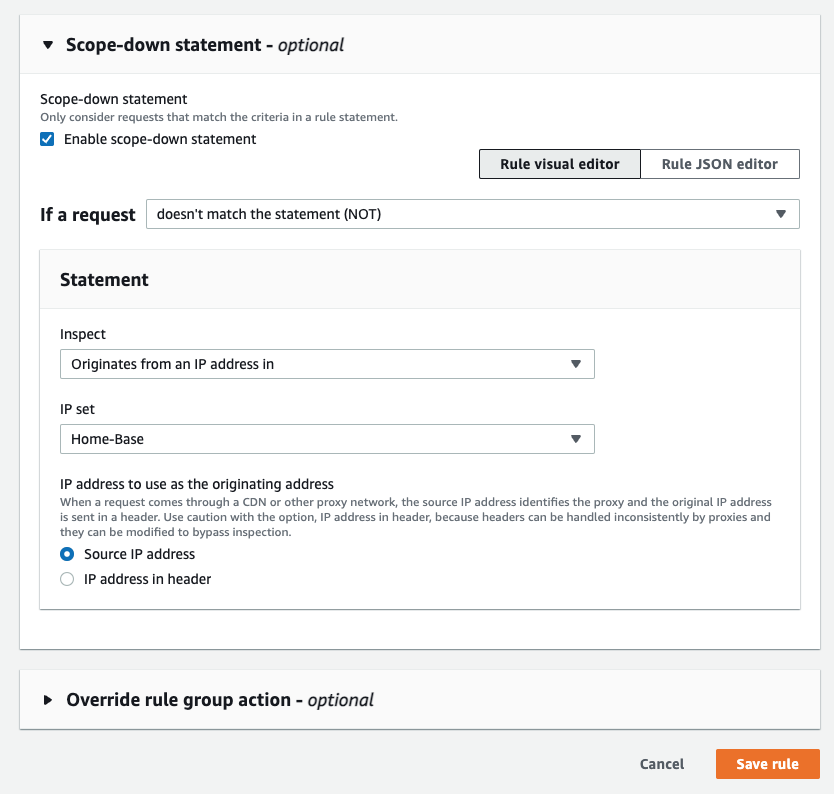
- In the Scope-down statement section, ensure the checkbox for Enable scope-down statement is selected.
- From the If a request drop-down, select the doesn’t match the statement(NOT) option, from the Inspect drop-down select Originates from an IP address in, from the IP Set drop-down select IP the set that you created earlier and select the Source IP address radio button.
- Select Save rule.
After editing the AWS-AWSManagedRulesAdminProtectionRuleSet rule, if you attempt to access the WordPress admin area from an IP that’s not listed in the IP Set, you will be greeted with a 403 Forbidden response.
To test it out, you can attempt to reach your WordPress admin area by using a connection through a VPN or via a mobile device or tablet using cellular data.
That concludes this blog post on how you can better protect your WordPress site using AWS WAF, Web ACLs, IP Sets and AWS Managed Rules.
Using AWS WAF to protect your WordPress site hosted on AWS
https://adrianthegreat.com/2023/02/18/Using-AWS-WAF-to-protect-your-Wordpress-site-hosted-on-AWS/


