Serverless FastAPI Security: Unlocked Doors Invite Unwanted Guests
In part 1 and part 2 of our Serverless FastAPI series, we covered the development and testing aspects of our FastAPI app. Now we’ll shift our attention to security.
Security shouldn’t be an afterthought, however, the theme of this series has been to get you up and running in a manner that is beginner-friendly, whilst also exposing you to shortcomings and approaches in an organic way.
Up until now, our Lambda Function URL has been publicly accessible, allowing every opportunist, every bad actor and their collective to have an open pass with an unprotected API provided they can find the endpoint URL.
The thought of an unprotected API in 2025 is starting to sound like a bad low-budget movie that went straight to DVD back in the 2000s. As the saying goes in the UK, it’s not looking good brav.
We’ll need to secure our API so that it’s not abused or compromised. AWS provides several complimentary security services that we can layer together to lock down access to our API.
We’ll implement security in two phases:
Phase 1: AWS IAM Authentication First, we’ll secure our existing Lambda Function URL by changing the authentication type from None to AWS_IAM, this restricts access to authenticated IAM users only.
Phase 2: OAuth 2.0 with API Gateway Then, we’ll implement a more sophisticated OAuth 2.0 flow using API Gateway and Amazon Cognito, suitable for client applications that need programmatic access.
Components that we’ll leverage for full OAuth 2.0 implementation:
- Amazon Cognito: Handles user authentication and authorization for your web and mobile apps.
- Resource Server: Defines API scopes that control what operations clients can perform.
- API Gateway: HTTP API that intercepts requests, validates JWT tokens and forwards authorized request to Lambda.
- JWT Authorizer: Built-in API Gateway component that validates JWT tokens against Cognito’s issuer and audience claims.
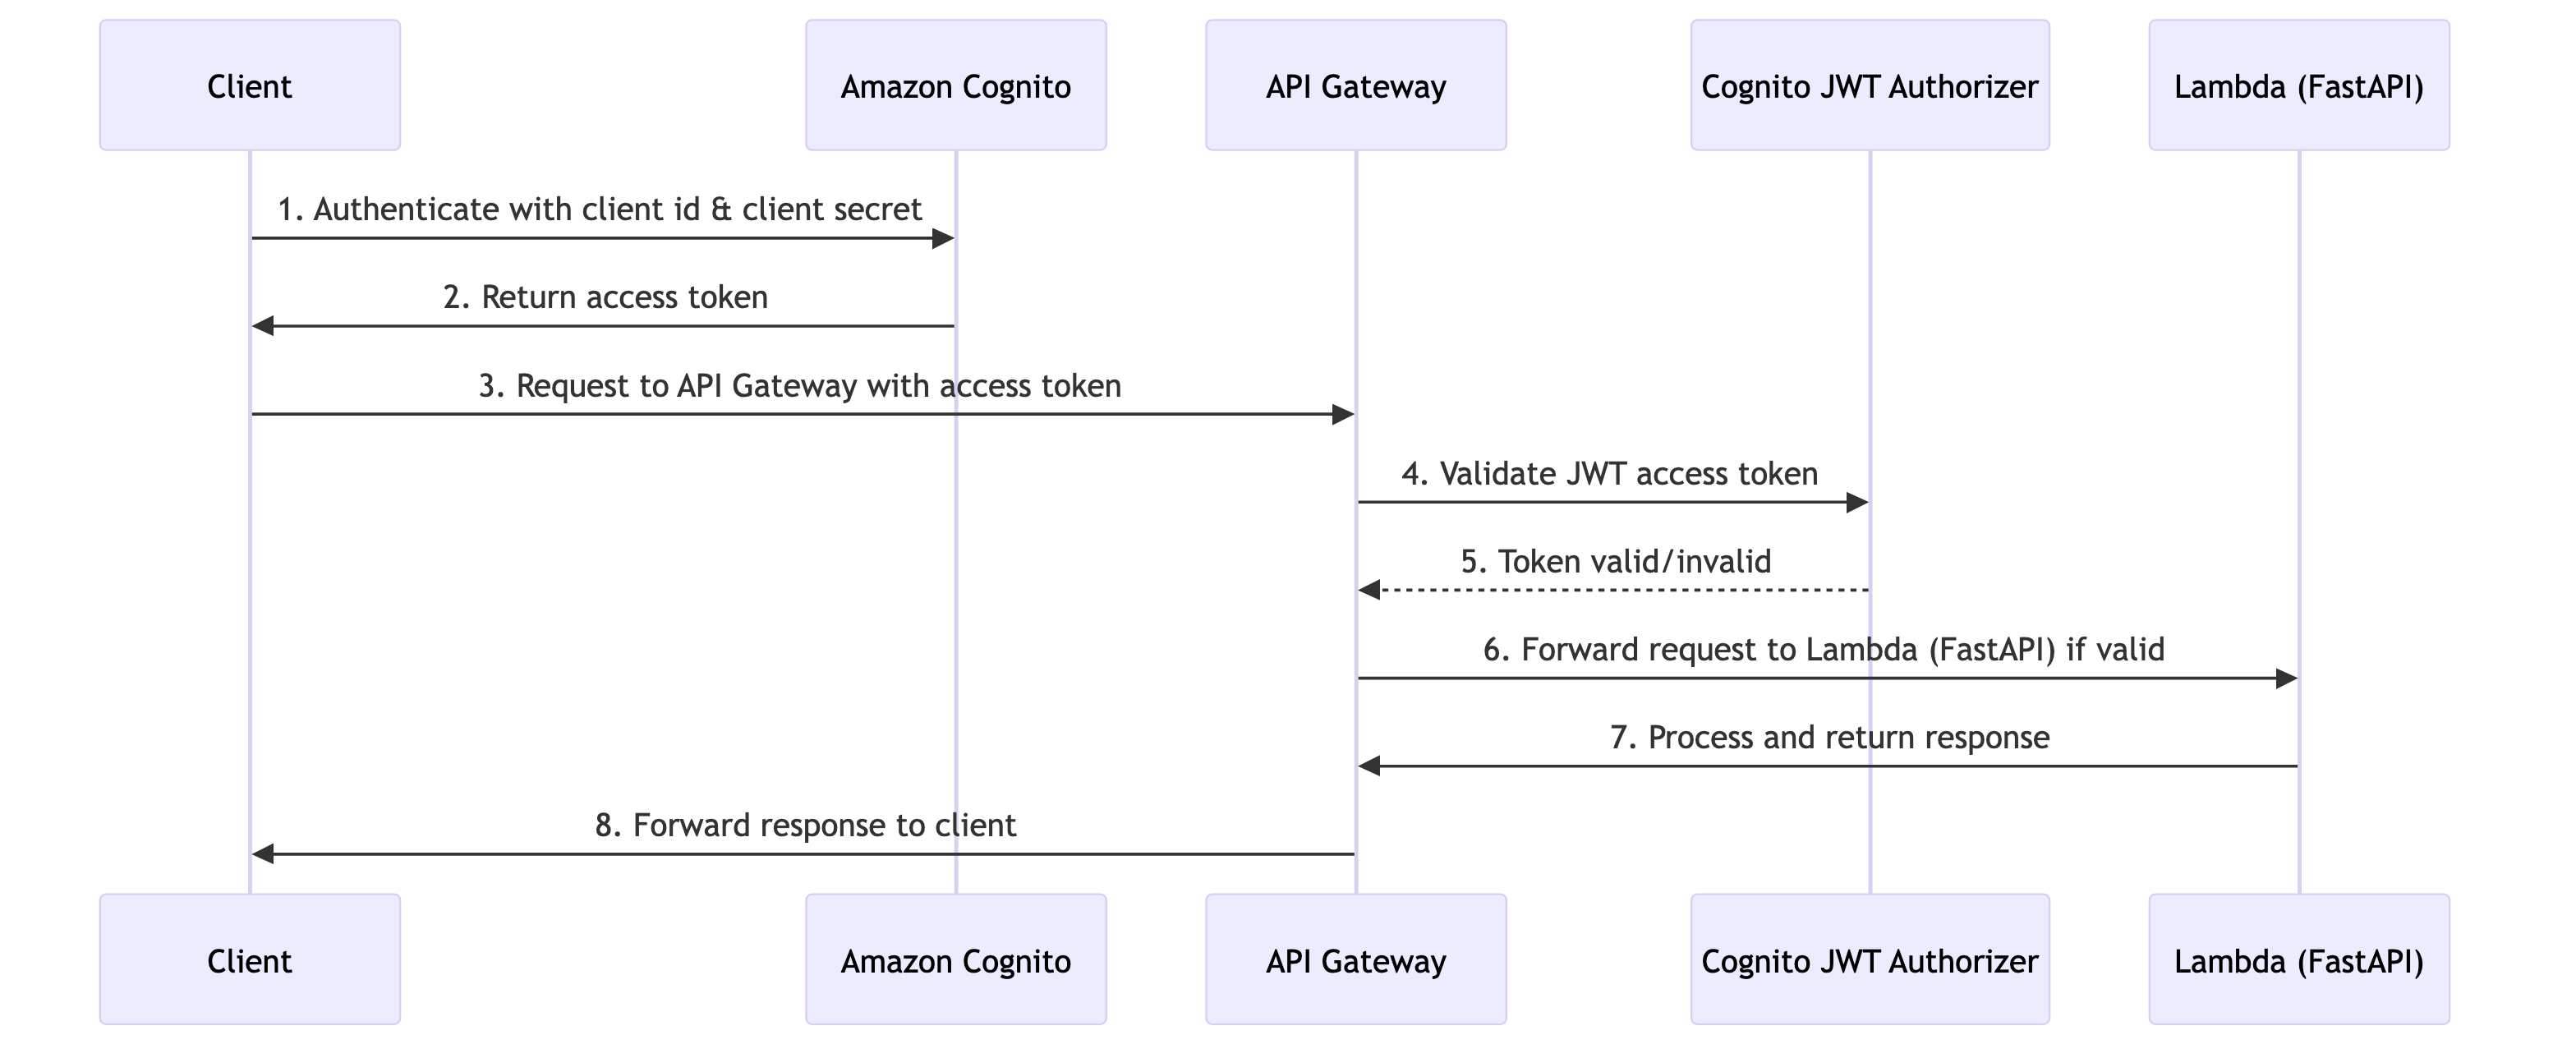
Below is a high-level sequence diagram that illustrates the OAuth 2.0 flow a client needs to complete to interact with our fully secured API.
Revisiting a familiar cdk stack
From the root of the project, activate the virtual environment, then navigate towards the iac directory and then open the iac_stack.py file.
We need to add a few imports for constructs that we will leverage as we build our security layer. Ensure that imports look like below:
Updating the Lambda Function URL authentication
There’s beauty in simplicity. Let’s start by securing our API, we can achieve this by changing the authentication type from None to AWS_IAM.
Deploy this change with cdk deploy
Now, if we attempt to access our API endpoint via a browser or REST API client like Postman, we’ll get a 403(Forbidden) response. Try it out!
Building the identity foundation with Amazon Cognito
We are going to create an Amazon Cognito User Pool, which is an OpenID Connect (OIDC) identity provider (IdP). Think of this as a guest list at an event, if you’re on the list, you’re allowed entry.
Creating our authentication domain
Next, we’ll create a User Pool Domain, if a User Pool is the guest list, then a User Pool domain is like the venue address where guests check in. It’s the specific location where your application(s) will send users to authenticate.
Setting access boundaries with the use of scopes
Next up is enforcing boundaries with the use of scopes. We have our guest list (User Pool) and our venue (User Pool Domain), but venues often have restricted areas, like a VVIP section cordoned off for elite members of society. That’s exactly what scopes do.
Scopes define the permission level that clients can request, in our case, full read/write access to the API.
Create Resource Server
Time to create the Resource Server. This is like officially registering your event with the venue’s management system. It tells the venue ‘this is our event, these are our VIP areas, and here are the access rules’, essentially linking your API to the permission system.
Setting up machine-to-machine access
We’re creating machine-to-machine access with a User Pool Client. Think of this as backstage crew passes, these aren’t for the audience, but for the technical staff, sound engineers or equipment operators who need to access different areas to keep the event running.
These credentials allow applications to authenticate themselves and request the access they need.
Building the fortress entrance
Now we’re building the fortress entrance with API Gateway. Think of this as constructing the main security checkpoint at your event’s entrance, the single point where every guest must pass through.
It’s the official gateway that intercepts everyone trying to enter, checks their credentials and either grants or denies access to the venue.
Scroll to the bottom of the file and add the below:
Create JWT Authorizer
Now we’re creating the JWT Authorizer. Think of this as installing a high-tech security scanner at your entrance checkpoint.
It automatically reads and validates the special security codes on each access pass, checking that they’re genuine, haven’t expired and were issued by the right authority. No human guard is needed to verify every detail.
Building Protected API Routes
Now we’re building protected API routes. Think of this as setting up specific security checkpoints for different areas of your venue, one for the main hall, another for VIP lounges and separate ones for backstage areas.
Each checkpoint knows exactly what credentials to check and directs validated guests to the right location.
This route protects the main players endpoint for add and retrieving players with JWT authorization for GET and POST operations.
Protects the individual player retrieval endpoint with JWT token validation.
Protects player update and removal endpoints (PATCH/DELETE) with JWT authorization.
Run cdk deploy
Testing our API using a REST API client
We’re going to test if our API still works with all the changes we have made. For that we will need a tool that can allow us to test our API, feel free to use any tool you’re comfortable with, I’ll use Postman from here on out.
Let’s retrieve the app credentials that were created for us using the CDK, open a browser and login to the AWS Management Console.
- Search for Cognito in the main search bar, select the service.
- Select PlayerFCUserPool under User Pools.
- Select App clients under Applications from the left-hand side of the window.
- Select PlayerFC-M2M-Client, you should see a Client ID and a hidden Client secret, leave the browser window open. We’ll revisit this page shortly.
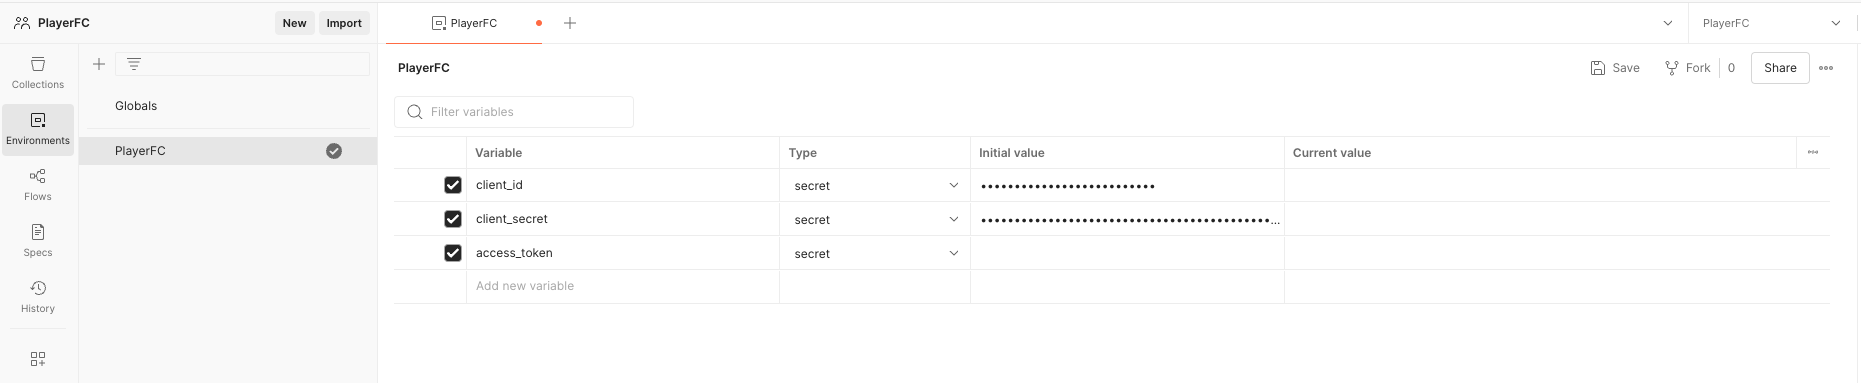
Creating an environment & variables in Postman
- Open Postman, select Environments from the sidebar.
- Select the “+“ button to create a new environment.
- Enter a name for the environment, perhaps PlayerFC shall suffice.
- Create a new variable called client_id, set the type to secret, copy and paste the client id value from the App client in Amazon Cognito and set as the current value.
- Create another variable called client_secret, set the type to secret, copy and paste the client secret value from the App client in Amazon Cognito and set as the current value.
- Create the the last variable called access_token, set the type to secret, leave the initial value blank.
- Select 💾 Save.
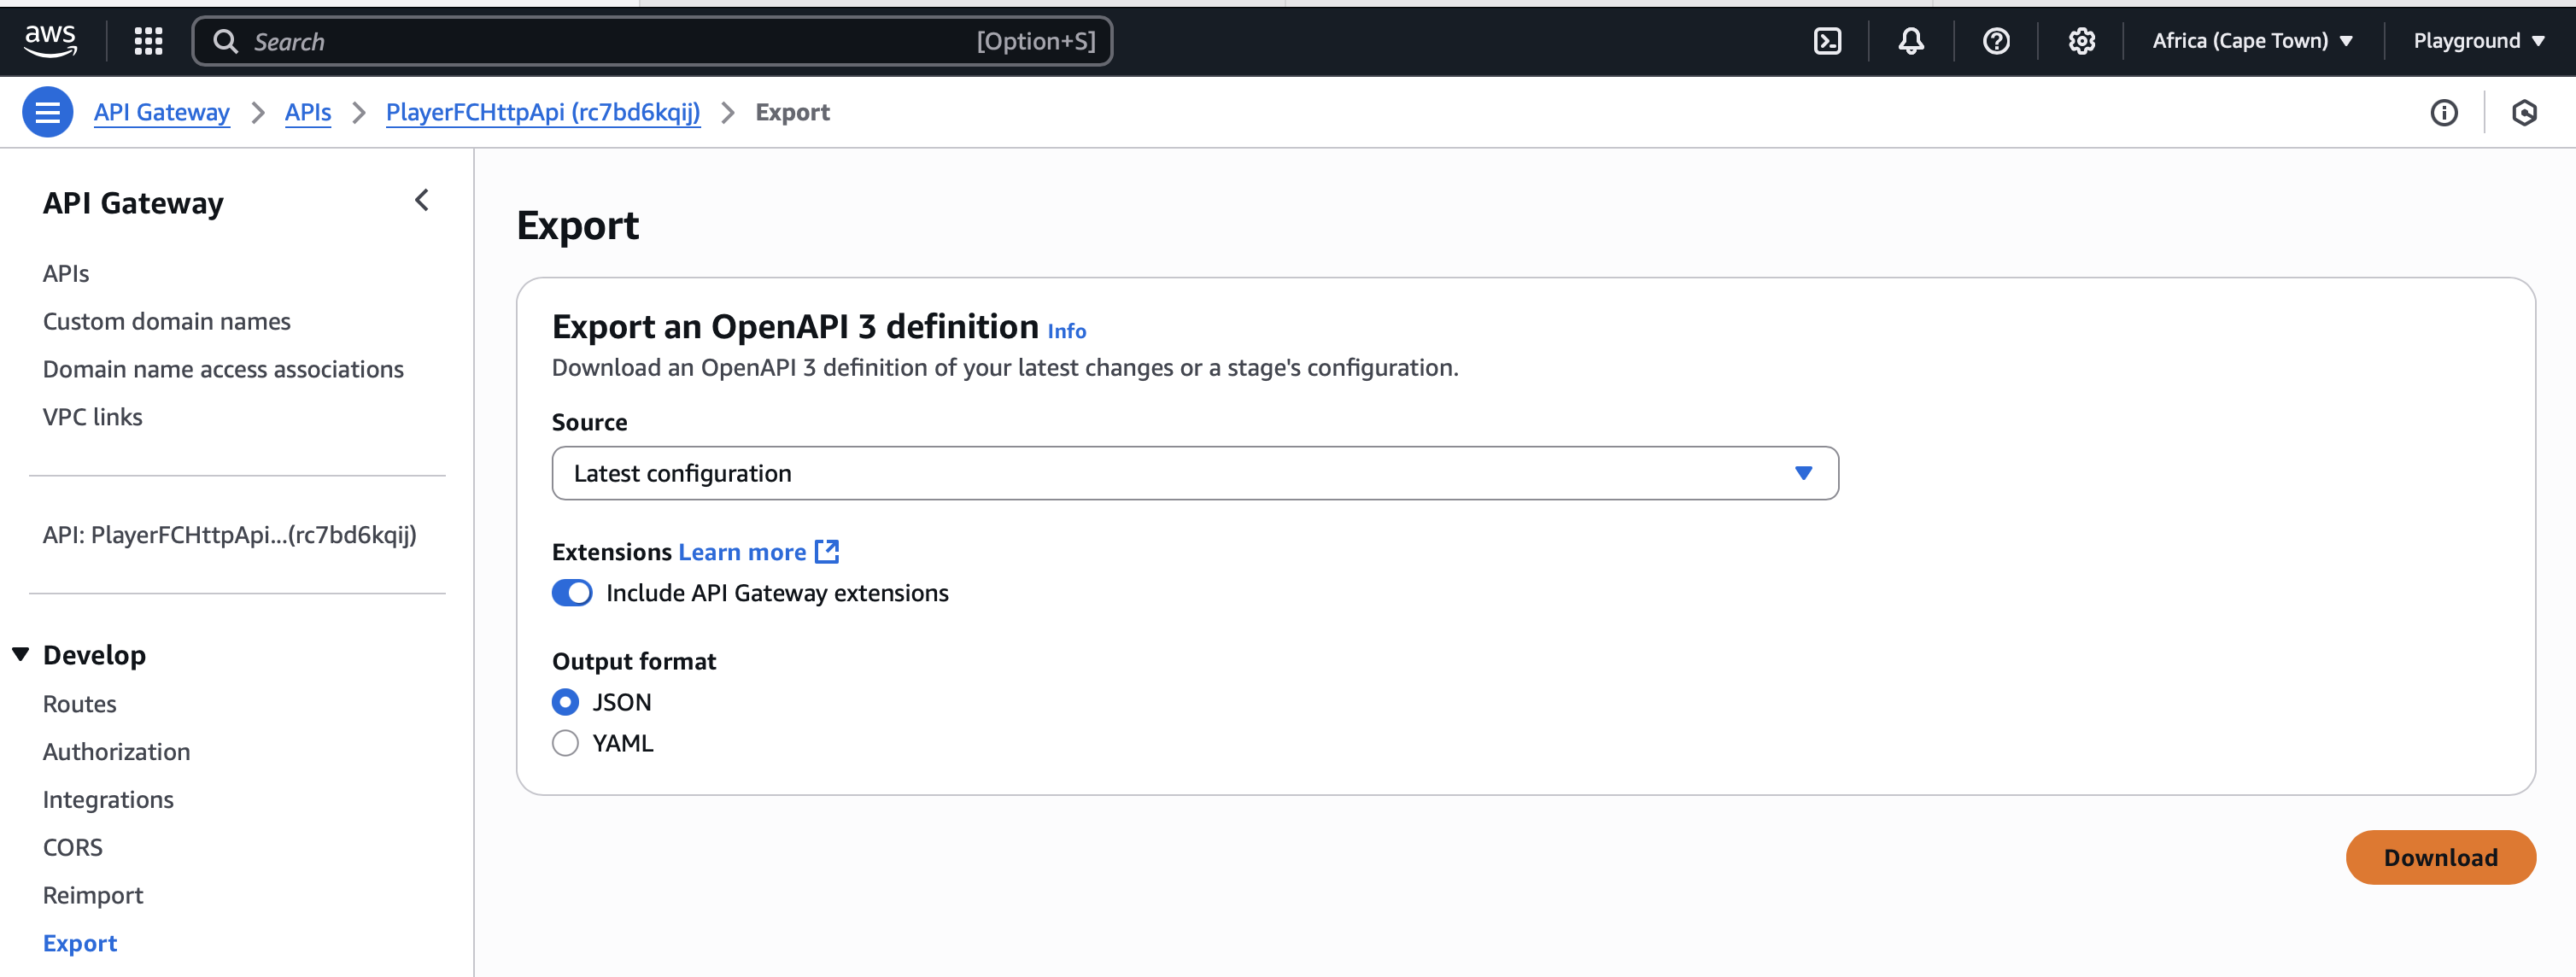
Exporting & Importing OpenAPI definition
Instead of manually creating the requests in Postman, we’ll head over to API Gateway export the OpenAPI definition and import the definition into Postman.
- Search for API Gateway in the AWS Management console. Select the service.
- Select PlayerFCHttpApi under APIs, select Export under Develop from the left sidebar.
- Select Latest configuration from the Source drop-down list.
- Ensure the toggle is set to on for Include API Gateway extensions.
- Select JSON under Output format.
- Click the Download button.
Navigate back to Postman and follow the below steps to import the OpenAPI definition:
- Select Collections from the left sidebar.
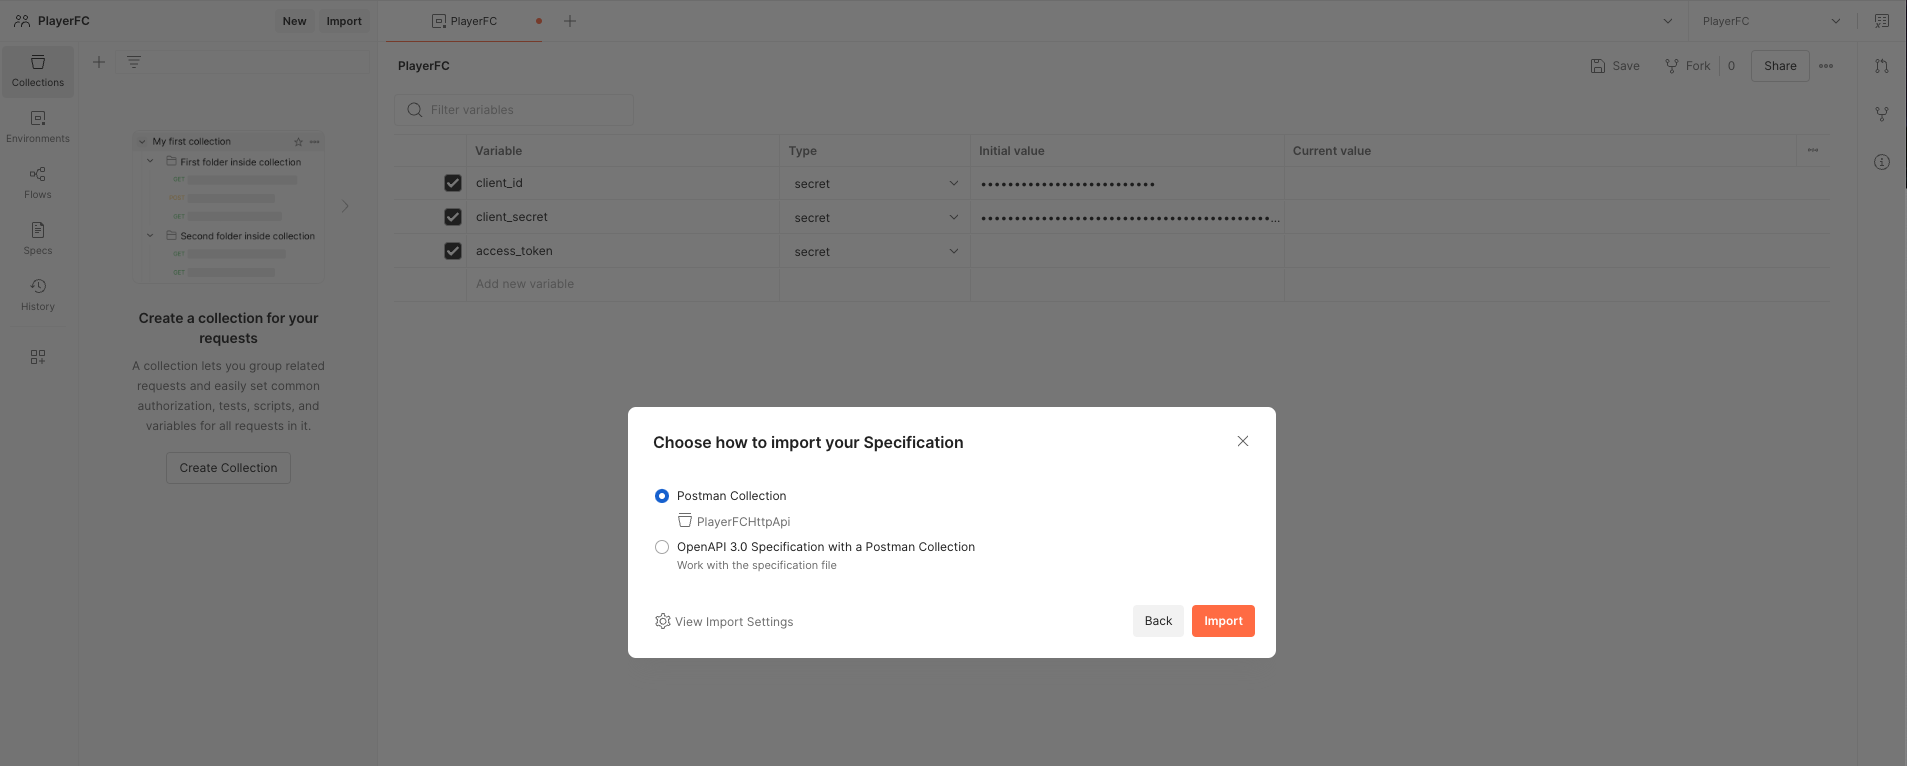
- Select Import, drag and drop the OpenAPI definition we downloaded earlier. Alternatively, select files, select the OpenAPI definition.
- Select Postman Collection, select Import.
Generating an access token
- Add a request under the players.
- Enter Generate access token as the name for this request.
- Select POST as the method.
- Enter https://playerfc.auth.af-south-1.amazoncognito.com/oauth2/token in the URL input box.
- Select the Authorization tab and ensure the Auth Type is set to No Auth.
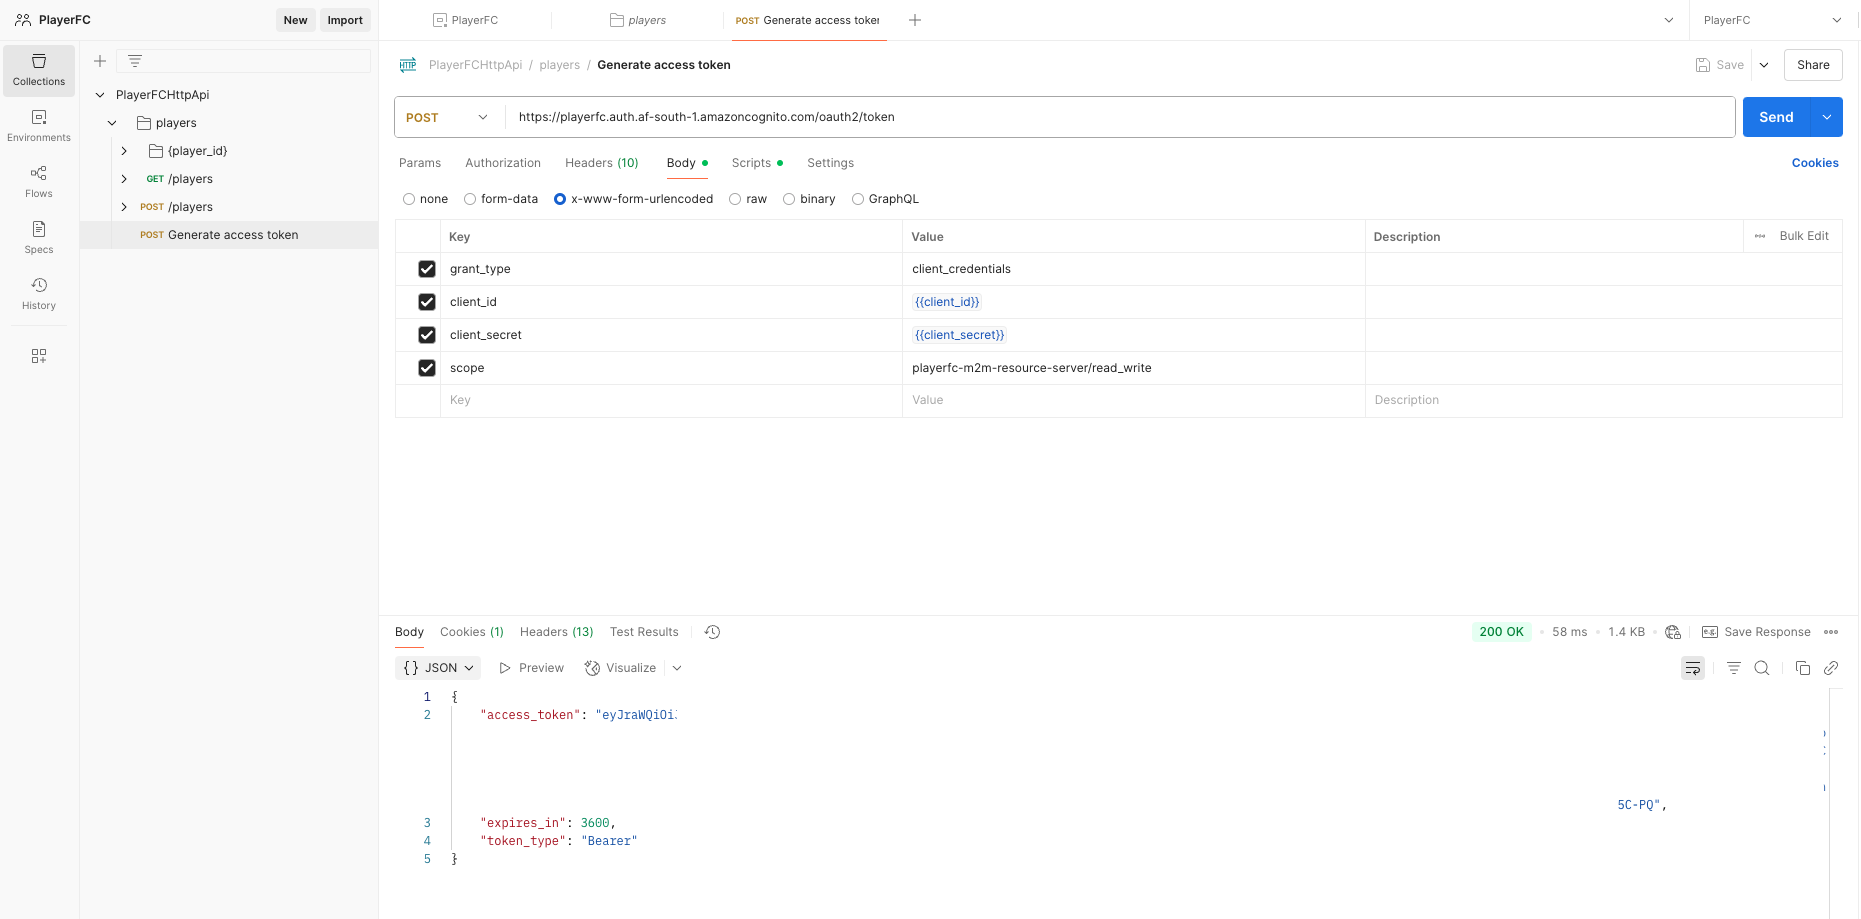
- Select the Body tab, select x-www-form-urlencoded, select Bulk Edit, copy and paste the below:

- Select the Scripts tab, copy and paste the below JavaScript for Post-response, this will automatically populate the access_token environment variable whenever you execute the Generate access token request:
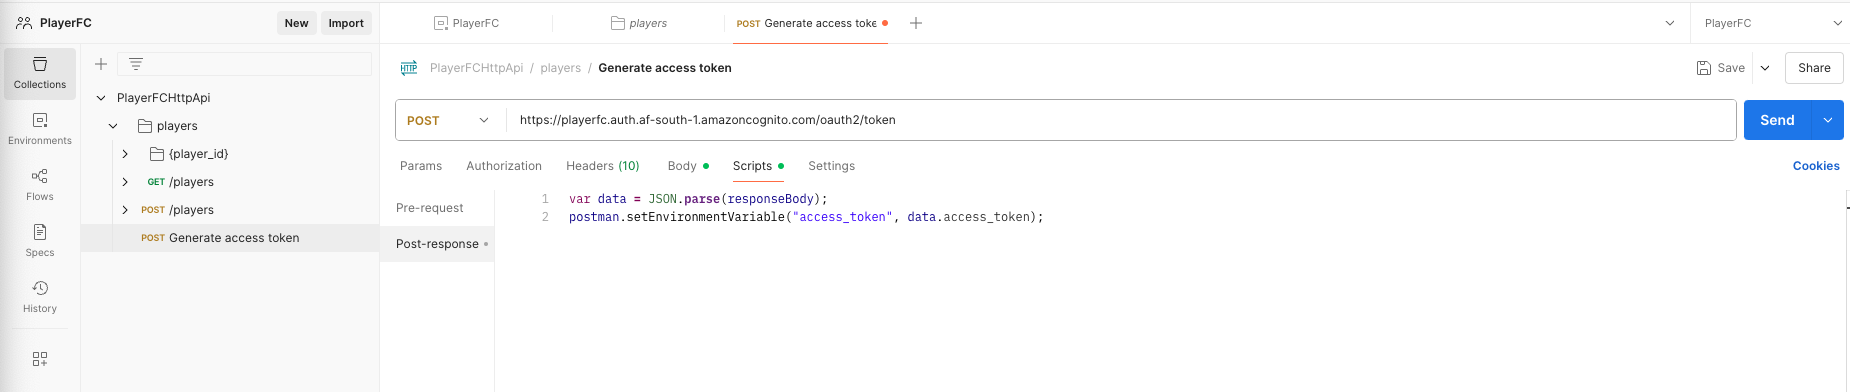
- Select 💾 Save.
- If you execute the request, an access token is returned and set as an environment variable.
Now that we have an access token, lets add a player, in the last blog it was Christoper Nkunku, keeping it within the French national team, let’s add Kylian Mbappé.
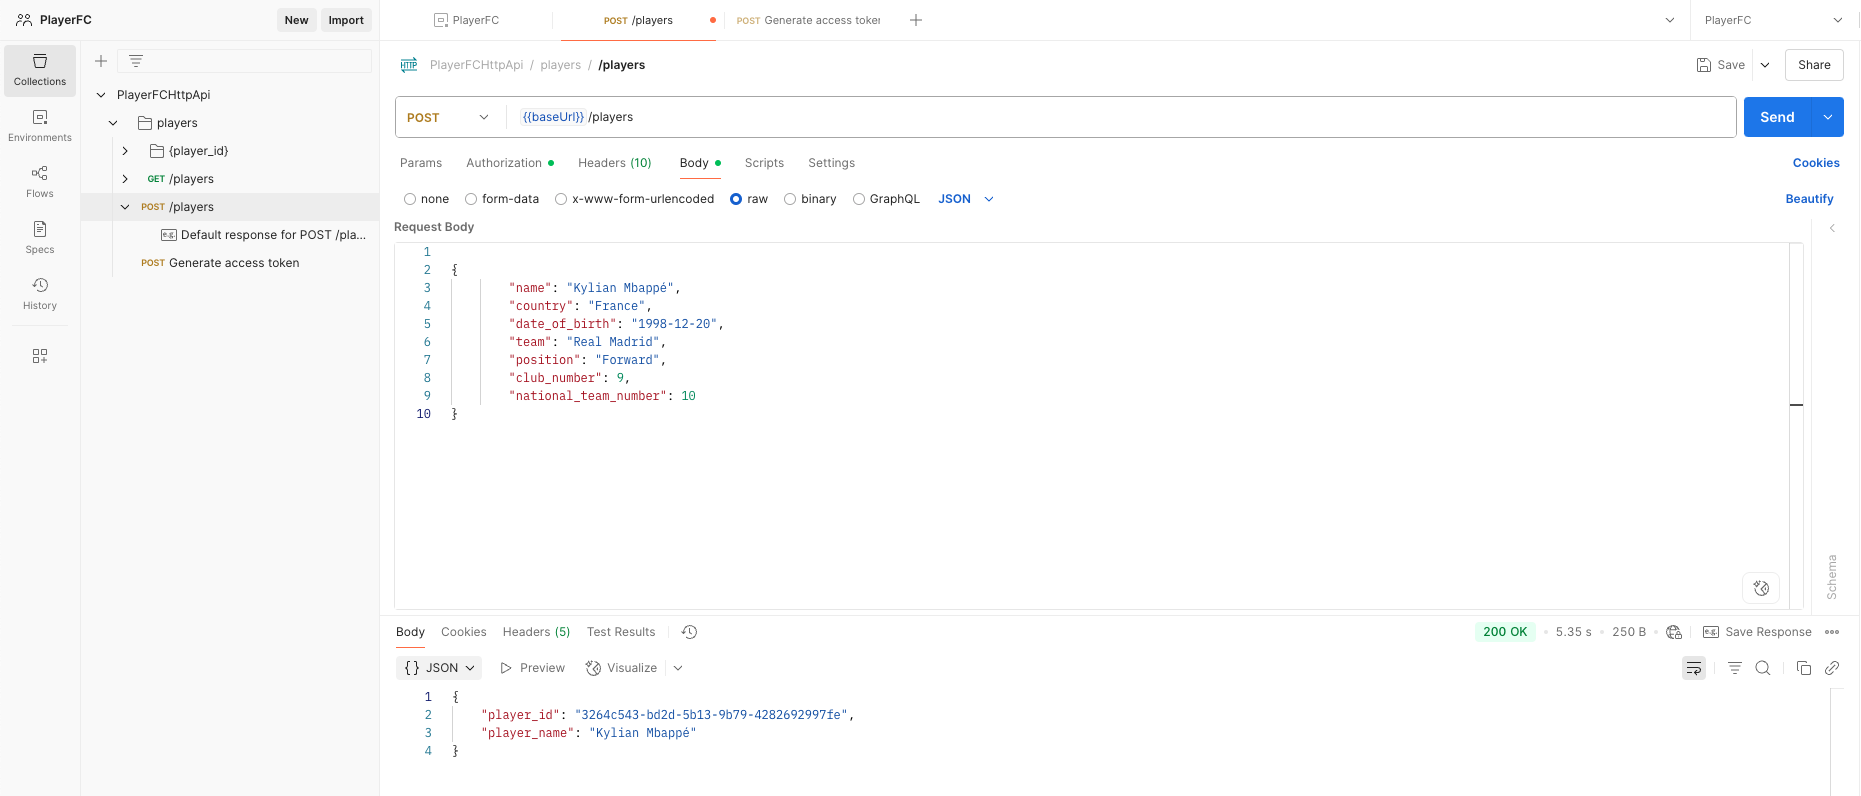
- Select the Post /players request.
- Select the Authorization tab, set the empty token field to access_token.
- Select the Body tab, select raw, copy and paste the below JSON payload into the request body:
- Select Send.
Feel free to test the other endpoints, don’t forget to set the access_token environment variable under the Authorization tab for all the other requests.
If you forget to add the access_token along with the request, you’ll be greeted with a 401(Unauthorized) response.
If you’re looking for the complete code, you’ll find it under my GitHub repo
With these security layers in place, your FastAPI app is protected from unauthorized access.
This project might squeeze another post in the series, only time will tell. Till then, take care.
Serverless FastAPI Security: Unlocked Doors Invite Unwanted Guests